Skip to content
  • Categories
  • Recent
  • Tags
  • Popular
  • Users
  • Groups
Collapse
Brand Logo

ModalAI Forum

P

psafi

@psafi
Unfollow Follow
About
Posts
24
Topics
6
Shares
0
Groups
1
Followers
0
Following
0

Posts

Recent Best Controversial

  • setting up VIO on VOXL2 (custom frame)
    P psafi

    @psafi Here are the steps I am taking for camera calibration:

    1- run the following command:
    voxl-calibrate-camera tracking_down -f -s 6x9 -l 0.022

    2- look at the overlay in portal (see the screenshot below)
    3- calibration process is not progressing automatically even though it seems like the checkerboard is detected

    e47c8511-c92f-4ce7-83f6-49d59dd89e7d-Screenshot from 2025-10-14 11-14-52.png

    GPS-denied Navigation (VIO)

  • setting up VIO on VOXL2 (custom frame)
    P psafi

    I am trying to set up VIO for a custom frame which has two ar0144 (down and front) cameras.
    I have followed this sequence so far:
    1- voxl-camera-serveris up and running and I can see both camera feed in portal and using voxl-inspect-cam
    2- saved Extrinsics to /etc/modal/extrinsics.conf
    3- made sure vio_cams.conf exists and information makes sense
    4- following instructions as outlined here: https://docs.modalai.com/open-vins/ (with the exception of my SDK version which in my case is 1.5.0)

    here is the default content of voxl-open-vins-server.conf:

    /**
     * This file contains configuration that's specific to voxl-open-vins-server.
     * 
     * *NOTE*: all time variables are measured in seconds
     */
    {
    	"en_auto_reset":	true,
    	"auto_reset_max_velocity":	20,
    	"auto_reset_max_v_cov_instant":	0.20000000298023224,
    	"auto_reset_max_v_cov":	0.20000000298023224,
    	"auto_reset_max_v_cov_timeout_s":	0.5,
    	"auto_reset_min_features":	1,
    	"auto_reset_min_feature_timeout_s":	3,
    	"auto_fallback_timeout_s":	3,
    	"auto_fallback_min_v":	0.600000023841858,
    	"en_cont_yaw_checks":	false,
    	"fast_yaw_thresh":	5,
    	"fast_yaw_timeout_s":	1.75,
    	"yaml_folder":	"/usr/share/modalai/voxl-open-vins/VoxlConfig/starling2",
    	"using_stereo":	0,
    	"takeoff_alt_threshold":	0.5,
    	"takeoff_occlude_stereo_left":	false,
    	"takeoff_occlude_stereo_right":	false,
    	"sync_config":	true
    }


    5- I see voxl-open-vins-server process is not running and when I try to run it manually I get the following warning/error:

    WARNING: cal file opencv_tracking_front_intrinsics.yml is missing or invalid
    run voxl-check-calibration to see what calibration files are missing
    WARNING: cal file opencv_tracking_down_intrinsics.yml is missing or invalid
    run voxl-check-calibration to see what calibration files are missing
    failed to find cam cal for vio cam tracking_front
    ERROR cam_config_file_read
    QUIT REQUESTED
    Shutting down cameras...
    Camera shutdown complete
    error code: -1


    I am currently in the process of calibrating the camera but I am unable to complete it. I can see the overlay in the portal and all corners being detected but calibration is not progressing beyond %0

    GPS-denied Navigation (VIO)

  • voxl-camera-server segmentation fault
    P psafi

    @psafi UPDATE: I re-flashed the SDK and it fixed it. voxl-camera-server is running and cameras are working. I am setting up VIO for a custom system. I believe a change I made along the way for VIO set up process could have caused this.

    Video and Image Sensors

  • voxl-camera-server segmentation fault
    P psafi

    @psafi with debug turned on:

    DEBUG:   Attempting to open the hal module
    DEBUG:   SUCCESS: Camera module opened on attempt 0
    DEBUG:   ----------- Number of cameras: 2
    
    VERBOSE: cci-direct: using voxl_platform_mod config 1 and 2 layout
    DEBUG:   Cam idx: 0, Cam slot: 0, Slave Address: 0x0030, Sensor Id: 0x0356
    DEBUG:   Cam idx: 1, Cam slot: 2, Slave Address: 0x0030, Sensor Id: 0x0356
    thread is locked to cores: 4 5 6 7
    connected to mavlink pipe
    Connected to cpu-monitor
    DEBUG:   
    ------ voxl-camera-server: Starting IMU manager
    DEBUG:   ------ voxl-camera-server: Starting 2 cameras
    Starting Camera: tracking_front (id #0)
    DEBUG:   Checking Gain limits for Camera: tracking_front
    DEBUG:   Using gain limits min: 54 max: 1596
    DEBUG:   cam ID 0 checking for fmt:   38  w: 1280 h:  800 o:   0
    DEBUG:   	==> option   0: format= 34 width=1280 height= 800 is_input=0
    DEBUG:   	==> option   4: format= 34 width=1280 height= 800 is_input=1
    DEBUG:   	==> option   8: format= 35 width=1280 height= 800 is_input=0
    DEBUG:   	==> option  12: format= 35 width=1280 height= 800 is_input=1
    DEBUG:   	==> option  16: format= 33 width=1280 height= 800 is_input=0
    DEBUG:   	==> option  20: format= 34 width=1280 height= 768 is_input=0
    DEBUG:   	==> option  24: format= 34 width=1280 height= 768 is_input=1
    DEBUG:   	==> option  28: format= 35 width=1280 height= 768 is_input=0
    DEBUG:   	==> option  32: format= 35 width=1280 height= 768 is_input=1
    DEBUG:   	==> option  36: format= 33 width=1280 height= 768 is_input=0
    DEBUG:   	==> option  40: format= 34 width=1280 height= 720 is_input=0
    DEBUG:   	==> option  44: format= 34 width=1280 height= 720 is_input=1
    DEBUG:   	==> option  48: format= 35 width=1280 height= 720 is_input=0
    DEBUG:   	==> option  52: format= 35 width=1280 height= 720 is_input=1
    DEBUG:   	==> option  56: format= 33 width=1280 height= 720 is_input=0
    DEBUG:   	==> option  60: format= 34 width=1024 height= 738 is_input=0
    DEBUG:   	==> option  64: format= 34 width=1024 height= 738 is_input=1
    DEBUG:   	==> option  68: format= 35 width=1024 height= 738 is_input=0
    DEBUG:   	==> option  72: format= 35 width=1024 height= 738 is_input=1
    DEBUG:   	==> option  76: format= 33 width=1024 height= 738 is_input=0
    DEBUG:   	==> option  80: format= 34 width=1024 height= 768 is_input=0
    DEBUG:   	==> option  84: format= 34 width=1024 height= 768 is_input=1
    DEBUG:   	==> option  88: format= 35 width=1024 height= 768 is_input=0
    DEBUG:   	==> option  92: format= 35 width=1024 height= 768 is_input=1
    DEBUG:   	==> option  96: format= 33 width=1024 height= 768 is_input=0
    DEBUG:   	==> option 100: format= 34 width= 864 height= 480 is_input=0
    DEBUG:   	==> option 104: format= 34 width= 864 height= 480 is_input=1
    DEBUG:   	==> option 108: format= 35 width= 864 height= 480 is_input=0
    DEBUG:   	==> option 112: format= 35 width= 864 height= 480 is_input=1
    DEBUG:   	==> option 116: format= 33 width= 864 height= 480 is_input=0
    DEBUG:   	==> option 120: format= 34 width= 800 height= 600 is_input=0
    DEBUG:   	==> option 124: format= 34 width= 800 height= 600 is_input=1
    DEBUG:   	==> option 128: format= 35 width= 800 height= 600 is_input=0
    DEBUG:   	==> option 132: format= 35 width= 800 height= 600 is_input=1
    DEBUG:   	==> option 136: format= 33 width= 800 height= 600 is_input=0
    DEBUG:   	==> option 140: format= 34 width= 800 height= 480 is_input=0
    DEBUG:   	==> option 144: format= 34 width= 800 height= 480 is_input=1
    DEBUG:   	==> option 148: format= 35 width= 800 height= 480 is_input=0
    DEBUG:   	==> option 152: format= 35 width= 800 height= 480 is_input=1
    DEBUG:   	==> option 156: format= 33 width= 800 height= 480 is_input=0
    DEBUG:   	==> option 160: format= 34 width= 720 height= 480 is_input=0
    DEBUG:   	==> option 164: format= 34 width= 720 height= 480 is_input=1
    DEBUG:   	==> option 168: format= 35 width= 720 height= 480 is_input=0
    DEBUG:   	==> option 172: format= 35 width= 720 height= 480 is_input=1
    DEBUG:   	==> option 176: format= 33 width= 720 height= 480 is_input=0
    DEBUG:   	==> option 180: format= 34 width= 640 height= 512 is_input=0
    DEBUG:   	==> option 184: format= 34 width= 640 height= 512 is_input=1
    DEBUG:   	==> option 188: format= 35 width= 640 height= 512 is_input=0
    DEBUG:   	==> option 192: format= 35 width= 640 height= 512 is_input=1
    DEBUG:   	==> option 196: format= 33 width= 640 height= 512 is_input=0
    DEBUG:   	==> option 200: format= 34 width= 640 height= 480 is_input=0
    DEBUG:   	==> option 204: format= 34 width= 640 height= 480 is_input=1
    DEBUG:   	==> option 208: format= 35 width= 640 height= 480 is_input=0
    DEBUG:   	==> option 212: format= 35 width= 640 height= 480 is_input=1
    DEBUG:   	==> option 216: format= 33 width= 640 height= 480 is_input=0
    DEBUG:   	==> option 220: format= 34 width= 640 height= 400 is_input=0
    DEBUG:   	==> option 224: format= 34 width= 640 height= 400 is_input=1
    DEBUG:   	==> option 228: format= 35 width= 640 height= 400 is_input=0
    DEBUG:   	==> option 232: format= 35 width= 640 height= 400 is_input=1
    DEBUG:   	==> option 236: format= 33 width= 640 height= 400 is_input=0
    DEBUG:   	==> option 240: format= 34 width= 640 height= 360 is_input=0
    DEBUG:   	==> option 244: format= 34 width= 640 height= 360 is_input=1
    DEBUG:   	==> option 248: format= 35 width= 640 height= 360 is_input=0
    DEBUG:   	==> option 252: format= 35 width= 640 height= 360 is_input=1
    DEBUG:   	==> option 256: format= 33 width= 640 height= 360 is_input=0
    DEBUG:   	==> option 260: format= 34 width= 352 height= 288 is_input=0
    DEBUG:   	==> option 264: format= 34 width= 352 height= 288 is_input=1
    DEBUG:   	==> option 268: format= 35 width= 352 height= 288 is_input=0
    DEBUG:   	==> option 272: format= 35 width= 352 height= 288 is_input=1
    DEBUG:   	==> option 276: format= 33 width= 352 height= 288 is_input=0
    DEBUG:   	==> option 280: format= 34 width= 320 height= 240 is_input=0
    DEBUG:   	==> option 284: format= 34 width= 320 height= 240 is_input=1
    DEBUG:   	==> option 288: format= 35 width= 320 height= 240 is_input=0
    DEBUG:   	==> option 292: format= 35 width= 320 height= 240 is_input=1
    DEBUG:   	==> option 296: format= 33 width= 320 height= 240 is_input=0
    DEBUG:   	==> option 300: format= 34 width= 240 height= 320 is_input=0
    DEBUG:   	==> option 304: format= 34 width= 240 height= 320 is_input=1
    DEBUG:   	==> option 308: format= 35 width= 240 height= 320 is_input=0
    DEBUG:   	==> option 312: format= 35 width= 240 height= 320 is_input=1
    DEBUG:   	==> option 316: format= 33 width= 240 height= 320 is_input=0
    DEBUG:   	==> option 320: format= 34 width= 176 height= 144 is_input=0
    DEBUG:   	==> option 324: format= 34 width= 176 height= 144 is_input=1
    DEBUG:   	==> option 328: format= 35 width= 176 height= 144 is_input=0
    DEBUG:   	==> option 332: format= 35 width= 176 height= 144 is_input=1
    DEBUG:   	==> option 336: format= 33 width= 176 height= 144 is_input=0
    DEBUG:   	==> option 340: format= 37 width=1280 height= 800 is_input=0
    DEBUG:   	==> option 344: format= 38 width=1280 height= 800 is_input=0
    DEBUG:   	==> option 348: format= 32 width=1280 height= 800 is_input=0
    DEBUG:   	==> option 352: format= 36 width=1280 height= 800 is_input=0
    VERBOSE: Successfully found configuration match for camera 0: 1280x800
    VERBOSE: Adding preview stream for camera: 0
    gbm_create_device(156): Info: backend name is: msm_drm
    DEBUG:   Successfully set up pipeline for stream: PREVIEW
    MISP Initializing for camera tracking_front
     Detected 1 platform(s)
     Detected 1 GPU device(s)
    Estimated imu dt = 0.000976s
    DEBUG:   Entering pitmode
    DEBUG:   Value of pitmode_active is: 1 
    
    Segmentation fault:
    Fault thread: voxl-camera-ser(tid: 2486)
    Segmentation fault
    
    
    Video and Image Sensors

  • voxl-camera-server segmentation fault
    P psafi

    I am seeing a pattern which voxl-camera-server will crash every time I have an image sensor plugged into a specific port (J6) on my VOXL. Could I have accidentally damaged hardware by plugging in the adapter board the wrong way?

    d5fcc6fb-3ee6-4665-a709-51e08285cca6-image.png

    Video and Image Sensors

  • Extrinsics Accuracy
    P psafi

    @Alex-Kushleyev Ok great. Thanks.
    One more question, to configure VIO/QVIO for a custom frame with a single (downward) camera, how should I go about following the documentations?

    I am starting with https://docs.modalai.com/open-vins/

    However I came across this:
    "This documentaion will assume that there are some steps that have already be taken. ...Assuming that we are working with between two and three camera tracking."

    are there different procedures for a system with single camera? Also a high-level roadmap on how to go about configuring VIO/QVIO for a custom frame would be appreciated in case information is in multiple places in documentation. Thank you for your support.

    Image Sensors

  • ESC Calibration failing
    P psafi

    @Alex-Kushleyev This is all great information. Thank you. We will continue tuning the motors using the utilities provided.

    On a separate note, I did not see the html report file in the voxl-esc-tools directory or other directories I looked at. Where do they get exported to?

    Power Modules

  • Extrinsics Accuracy
    P psafi

    @Alex-Kushleyev Thank you. This is helpful.

    What is QVIO as opposed to VIO? My goal is to set up VIO on a custom quadcopter frame and I am following these instructions. I don't see any mention of qvio

    Image Sensors

  • ESC Calibration failing
    P psafi

    Hello,

    we are trying to calibrate a m0138 ESC using a VOXL2 mini. We have upgraded the ESC firmware using the provided scripts. We were able to run the script on m0 successfully and motors spun all the way to the max rpm set in the config file (see attached log). However, the calibration failed to spin the motors all the way up to the max pwm value for second motor (it keeps resetting to 0 , ramps up again and never exceeds about %15-20). attached is output log of the failed test as well.

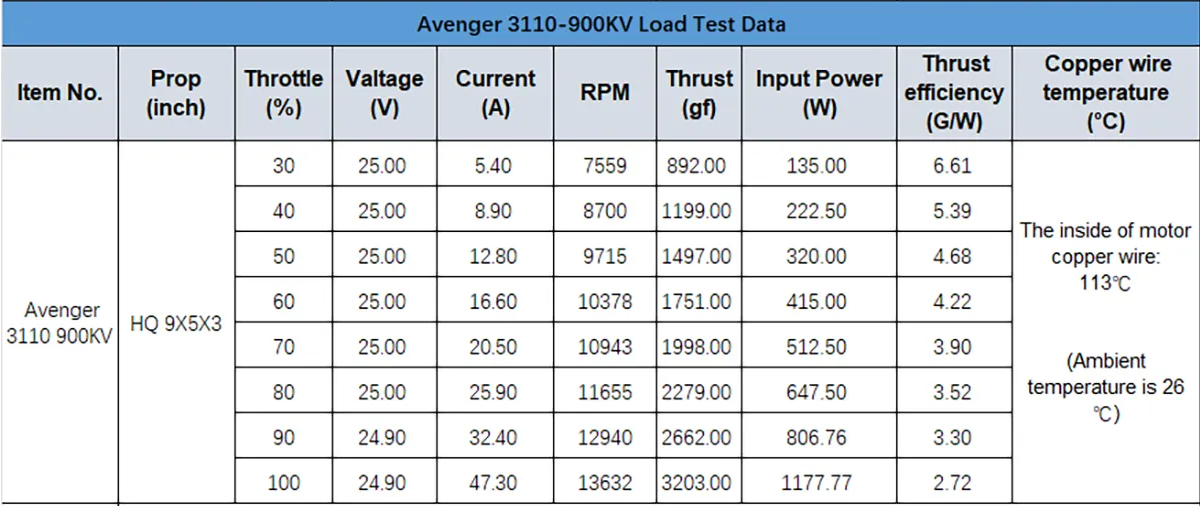
    we also tested a version which we updated the number of poles and kv to match our actuators and we seemed to experience similar issue.

    link to calibration logs

    Below are some of printouts of the python scripts and also specifications for the actuator we are using:

     ./voxl-esc-board-detect.py 
    Detected Python version : 3.6.9 (default, Mar 10 2023, 16:46:00) 
    [GCC 8.4.0]
    Found voxl-esc tools bin version: 1.9
    VOXL Platform: M0104
    Detected RB5 Flight, VOXL2 M0054 or M0104!
    INFO: Scanning for ESC firmware: /dev/slpi-uart-2, baud: 2000000
    Sending library name request: libslpi_qrb5165_io.so
    Sending initialization request
    INFO: ESC(s) detected on port: /dev/slpi-uart-2, baud rate: 2000000
    INFO: Detected protocol: firmware
    INFO: Additional Information:
    INFO: ---------------------
    ESC detected: ModalAi 4-in-1 ESC (M0138-1)
    ESC detected: ModalAi 4-in-1 ESC (M0138-1)
    ESC detected: ModalAi 4-in-1 ESC (M0138-1)
    ESC detected: ModalAi 4-in-1 ESC (M0138-1)
    ---------------------
    
    
     ./voxl-esc-verify-params.py 
    Detected Python version : 3.6.9 (default, Mar 10 2023, 16:46:00) 
    [GCC 8.4.0]
    Found voxl-esc tools bin version: 1.9
    VOXL Platform: M0104
    Detected RB5 Flight, VOXL2 M0054 or M0104!
    INFO: Scanning for ESC firmware: /dev/slpi-uart-2, baud: 2000000
    Sending library name request: libslpi_qrb5165_io.so
    Sending initialization request
    INFO: ESC(s) detected on port: /dev/slpi-uart-2, baud rate: 2000000
    INFO: Params from ID 0 match ../voxl-esc-params/FPV_RevB/m0138_xing2_1855_5x4x3.xml
    INFO: Params from ID 1 match ../voxl-esc-params/FPV_RevB/m0138_xing2_1855_5x4x3.xml
    INFO: Params from ID 2 match ../voxl-esc-params/FPV_RevB/m0138_xing2_1855_5x4x3.xml
    INFO: Params from ID 3 match ../voxl-esc-params/FPV_RevB/m0138_xing2_1855_5x4x3.xml
    INFO: Success! Params in all ESCs are valid and identical.
    
    ./voxl-esc-scan.py 
    Detected Python version : 3.6.9 (default, Mar 10 2023, 16:46:00) 
    [GCC 8.4.0]
    Found voxl-esc tools bin version: 1.9
    VOXL Platform: M0104
    Detected RB5 Flight, VOXL2 M0054 or M0104!
    INFO: Scanning for ESC firmware: /dev/slpi-uart-2, baud: 2000000
    Sending library name request: libslpi_qrb5165_io.so
    Sending initialization request
    INFO: ESC(s) detected on port: /dev/slpi-uart-2, baud rate: 2000000, protocol: firmware
    
    
    INFO: ESC Information:
    INFO: ---------------------
    	ID         : 0
    	Board      : version 42: ModalAi 4-in-1 ESC (M0138-1)
    	UID        : 0x203030335546571500280020
    	Firmware   : version  39.20, hash 9c6233d6
    	Bootloader : version    184, hash e1c038de
    
    	ID         : 1
    	Board      : version 42: ModalAi 4-in-1 ESC (M0138-1)
    	UID        : 0x20303033554657150044001F
    	Firmware   : version  39.20, hash 9c6233d6
    	Bootloader : version    184, hash e1c038de
    
    	ID         : 2
    	Board      : version 42: ModalAi 4-in-1 ESC (M0138-1)
    	UID        : 0x2030303355465715004B0020
    	Firmware   : version  39.20, hash 9c6233d6
    	Bootloader : version    184, hash e1c038de
    
    	ID         : 3
    	Board      : version 42: ModalAi 4-in-1 ESC (M0138-1)
    	UID        : 0x20303033554657150027001E
    	Firmware   : version  39.20, hash 9c6233d6
    	Bootloader : version    184, hash e1c038de
    
    ---------------------


    59922b11-7349-4a8f-91ff-89a045578d76-image.png

    Power Modules

  • Extrinsics Accuracy
    P psafi

    what kind of dimensional tolerances are acceptable when configuring the extrinsics for VIO when building a custom vehicle?

    Image Sensors

  • GPIO missing in /sys/class/gpio
    P psafi

    @psafi said in GPIO missing in /sys/class/gpio:

    @Alex-Kushleyev Thank you!
    I understand these ports are intended for RC input and QUP7 is connected directly to the DSP. I am considering these ports to connect a SiK radio (data format can be raw or mavlink). I want to make information coming through the radio available to ROS and PX4 at the same time. Can I use this port at all for application running on linux or is this only available to voxl-px4?

    I am already using the External UART (J10) for another MAVLink device (optical flow sensor board) which is currently configured and working with PX4 (I don't need to intercept that one on the linux side). Would it be possible to connect my serial radio to J10 and switch my optical flow to J19 (and configure PX4 to read MAVLink from J19-10,11)?

    VOXL 2 Mini

  • GPIO missing in /sys/class/gpio
    P psafi

    @Alex-Kushleyev Thank you!
    I understand these ports are intended for RC input and QUP7 is connected directly to the DSP. I am considering these ports to connect a SiK radio (data format can be raw or mavlink). I want to make information coming through the radio available to ROS and PX4 at the same time. Can I use this port at all for application running on linux or is this only available to voxl-px4?

    VOXL 2 Mini

  • GPIO missing in /sys/class/gpio
    P psafi

    @psafi I was able to use the info in the link below to enable the GPIO pin

    Link Preview Image
    Voxl-IO questions (GPIO & i2c)

    We have example Python code in voxl-modem to control the B2B GPIO ## All GPIO pins need to be exported before they can be used # def gpio_export(num): su...

    favicon

    ModalAI Forum (forum.modalai.com)

    VOXL 2 Mini

  • GPIO missing in /sys/class/gpio
    P psafi

    I'm trying to connect a serial device to J19 (Pin10, 11)

    voxl-gpio read 179 
    ERROR:   Failed to open path /sys/class/gpio/gpio1279/value
    

    I don't see GPIO 178 and 179 on my system:
    3de32c5d-542b-49b3-8652-c4536fc502e6-image.png

    VOXL 2 Mini

  • Lumenier RID & M10Q GPS Module compatibility
    P psafi

    @Eric-Katzfey I did the systemctl stop and started service again. I guess rebooting the board earlier did not have the same effect. The compass calibration in Q is working now (no more "no mag found" error) which I guess it means the mag is working now and our gps is working too.

    here is the output of voxl-p4 -d by the way:

    INFO  [qshell] Send cmd: 'lis3mdl start -R 10 -X -b 1'
    INFO  [muorb] [uORB] Marking DeviceNode(qshell_req) as advertised in process_remote_topic
    INFO  [muorb] [qshell] qshell gotten: lis3mdl start -R 10 -X -b 1
    INFO  [muorb] [qshell]   arg0 = 'lis3mdl'
    INFO  [muorb] [qshell]   arg1 = 'start'
    INFO  [muorb] [qshell]   arg2 = '-R'
    INFO  [muorb] [qshell]   arg3 = '10'
    INFO  [muorb] [qshell]   arg4 = '-X'
    INFO  [muorb] [qshell]   arg5 = '-b'
    INFO  [muorb] [qshell]   arg6 = '1'
    INFO  [muorb] [drivers__device] *** I2C Device ID 0x51e09 335369
    INFO  [muorb] [drivers__device] Set up I2C bus mutex for bus 1
    INFO  [muorb] lis3mdl #0 on I2C bus 1
    INFO  [muorb]  (external)
    INFO  [muorb]  address 0x1E
    INFO  [muorb]  rotation 10
    INFO  [muorb] 
    
    INFO  [muorb] [qshell] Ok executing command: lis3mdl start -R 10 -X -b 1
    
    
    VOXL 2 Mini

  • Lumenier RID & M10Q GPS Module compatibility
    P psafi

    @Eric-Katzfey by installing debian package and I got output similar to this after installation:
    https://gitlab.com/voxl-public/voxl-sdk/services/voxl-px4#deployment

    VOXL 2 Mini

  • Lumenier RID & M10Q GPS Module compatibility
    P psafi

    @Eric-Katzfey I did that and was able to build and install new px4. Thank you!

    Sill not detecting lis3mdl module on the px4 side.

    I tried adding the following to /usr/bin/voxl-px4-start

    qshell lis3mdl start -R 10 -X -b 1
    

    but I think that causes px4 service fail to start. Not sure if that means the module has not been successfully added to voxl-px4 or some other issue.

    Are there any steps I need to take besides adding sensor name to default.px4board file?

    VOXL 2 Mini

  • Lumenier RID & M10Q GPS Module compatibility
    P psafi

    @Eric-Katzfey I am able to build voxl-px4 now.

    I am following instructions outlined here to add this magnetometer:
    https://forum.modalai.com/post/16770

    I am adding following line:

    CONFIG_DRIVERS_MAGNETOMETER_LIS3MDL=y
    

    to this file:
    https://github.com/modalai/px4-firmware/blob/voxl-dev/boards/modalai/voxl2-slpi/default.px4board

    when I attempt to build px4 I get the following error from the driver module:
    e58ba536-27d6-45cd-9d25-2a67e6f48462-image.png

    VOXL 2 Mini

  • UART rangefinder integration with VOXL 2 Mini
    P psafi

    @Eric-Katzfey Ok great. This is working now. It would be great if you can give me some idea of the underlying architecture for troubleshooting in the future and also making sure this is not going to have any side effects on the entire system. What is the role of voxl-mavlink-server in all of this? I understand we are telling voxl-px4 to expect mavlink messages on ttyHS0.

    I see messages 132 and 106 start showing up in output of "mavlink-server -k" which is "show debug info on messages coming from autopilot" and they stop showing up when I unplug the sensor. It'd be great if you can give me some idea of flow of information.

    VOXL 2 Mini
  • Login

  • Don't have an account? Register

  • Login or register to search.
  • First post
    Last post
0
  • Categories
  • Recent
  • Tags
  • Popular
  • Users
  • Groups